Gluten Free Bread Recipe
Since being diagnosed with coeliac disease in 2005 (Or thereabouts. My medical records were lost…) I’ve been trying to make a decent gluten free bread. It’s tricky since gluten is the very thing that makes bread work, but with a lot of experimentation and some Science I’ve found a recipe that works pretty well. This loaf is gluten, diary and egg free, and could be made soy free as well.
Unlike a lot of commercial gluten-free breads this is made from high-protein flours as well as light starches. It won’t be as fluffy as a commercial bread, it’s quite dense but not dry.
The loaves rise well and hold together and you can even use them for sandwiches! The majority of the ingredients are whole gluten-free grains so there’s a decent nutritional content, unlike some of the gluten free white breads available. I’ve also included a guide for substitutions if you cannot get hold of some of the flours.
I do use one slightly controversial ingredient to achieve egg free status. If you don’t have any issues with eggs I’ve included instructions for using eggs, but the bread will not be quite as strong.
The original recipe I used was the garbanzo bread from The Gluten-Free Gourmet Bakes Bread by Bette Hagman, but it has been extensively modified to cope with availability of ingredients in New Zealand and for what I found through experimentation. I fully recommend that book if you want to try other things, like pizza bases, crumpets, and many other breads.
I’ve also included links through to Amazon.com for equipment and some more exotic ingredients if you want to get started.
Contents
Time
Preparation: 1/2 hour
Rising: 1 hour
Baking: 1 hour
Equipment
- A stand mixer with paddle and dough hook attachments. I use a Breville scraper mixer. I really want a Kitchenaid but at over NZ$1000 I can’t justify it (yet). If you’re persistent you may be able to use a handheld mixer, but this requires 8+ minutes of continual mixing.
- Accurate measuring spoons and cups. These are almost identical between countries, except Australia. See below.
- A large bread pan (9"x5”, or 22.5x12.5cm as they’re sold here)
- Baking paper cut to line the bread pan. Don’t skip this.
- A warm place (around 35°C) to let the bread rise
Note for Australians Your tablespoon is too big. Use three teaspoons instead.
Ingredients
Where appropriate I’ve included alternate names. This is written with the names used in New Zealand. You should be able to find most from a health food store. I’ve linked through to Amazon.com (through my affiliate account) for reference, but any equivalent ingredient should work.
I’ve linked to Bob’s Red Mill flours because they’re produced and packed in a dedicated gluten free facility.
How to measure
Flour cups are a “loose” cup. Do not scoop with the measuring cup, it will pack down and you’ll get too much flour. Instead spoon the flour in to the cup until it heaps then use the spoon handle or the back edge of a table knife to level the cup.
Dry
Can’t find the flours? See my notes on substituting
- 1 cup buckwheat flour
- 1/2 cup chickpea (garbanzo) flour
- 1/2 cup sorghum flour
- 1/2 cup tapioca flour
- 1/2 cup cornflour (corn starch in the USA)
- 2 1/2 tsp active dried yeast
- 1 tbsp psyllium husk
- 1 tbsp whole chia seeds
- 2 tsp xanthan gum
- 1 tsp guar gum
- 1 tsp cellulose-based egg replacer
- 1 tsp salt
- 1 tsp hydroxypropyl methylcellulose (HPMC).
Alternatively you can use eggs, see the wet ingredients.
About HPMC and why I use it.
Wet
- 1 2/3 cups warm water (around 40°C)
- 1/4 cup dairy free margarine (or butter if dairy’s OK)
- 1/4 tsp vinegar
- 2 tbsp brown sugar, packed
- 2 tbsp honey (can substitute with 2 more tbsp brown sugar)
- 1 tsp lecithin powder or granules
I use soy, you could subsitute sunflour lecithin or omit it. Omitting may result in a less consistent loaf.
If not using HPMC:
- 1 egg and 2 whites
Method
First line your bread tin with baking paper and spray with a little oil. Do not use the tin unlined, this dough can stick to even a non-stick tin.
Sift together the flours and starches, then whisk in the other dry ingredients. Sifting is important to combine the flours evenly, skipping this step will lead to an uneven rise, even after all the mixing.
Whisk together the wet ingredients, including eggs if used, and add to the bowl of your mixer.
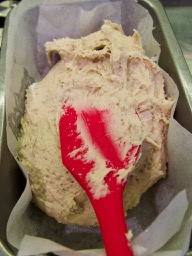
Using the paddle mixing attachment on slow add the dry ingredients a tablespoonful at a time. Wait for the mixture to mostly combine before adding more, at the start there may be persistent lumps but they will mix in as it thickens. After about 3/4 of the mix is added the you may have to switch to the dough hook to avoid overloading the mixer, this depends entirely on your mixer. If you are using eggs the mix will be much wetter.
After all the ingredients are well mixed set the mixer to a medium-high speed and mix for four more minutes. This is especially important if using eggs as it will work the egg proteins.
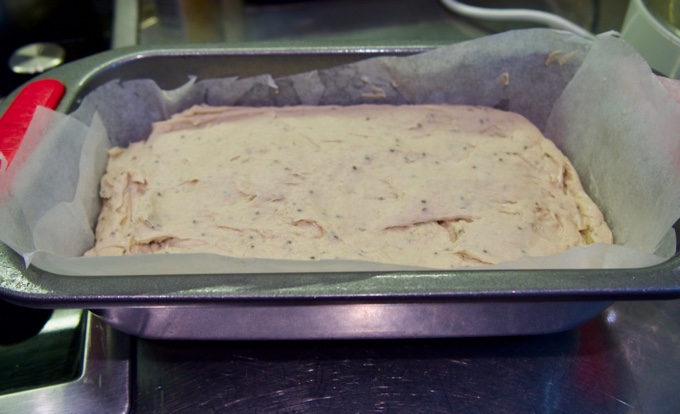
Transfer the dough in to the bread tin. Right now it will be a sticky mess that doesn’t look very bread-like.
Smooth into the corners of the pan by spraying surface with oil or water. You can also dust with flour, but I find this can lead to an overly dry surface that cracks when baking.
Allow to rise for an hour in a warm place. While rising every 15 to 20 minutes lift the bread pan 1-2 cm (just under an inch) and drop it on a hard surface. This causes and large bubbles to break and helps avoid large voids forming in the bread. With gluten-bread this would be knocking back but this mix is too sticky. You’ll probably see the loaf shrink noticably, but don’t worry. After an hour the dough should nearly double in size.
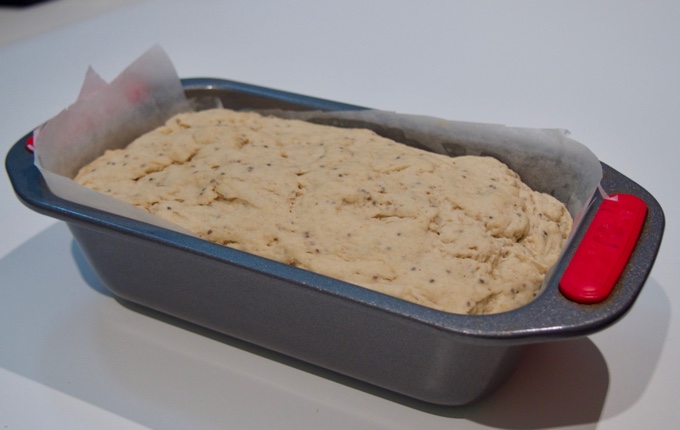
Preheat your oven to 180° (conventional) or 160° (fan-forced). I’ve only tested this on a fan-forced electric oven so gas or conventional may require some changes. Place the bread in the centre of the oven once it has completed rising.
After 10 minutes baking cover the bread in cooking foil to stop the top crust burning. A bottom-heat oven probably won’t have this problem but I don’t have a fancy oven.
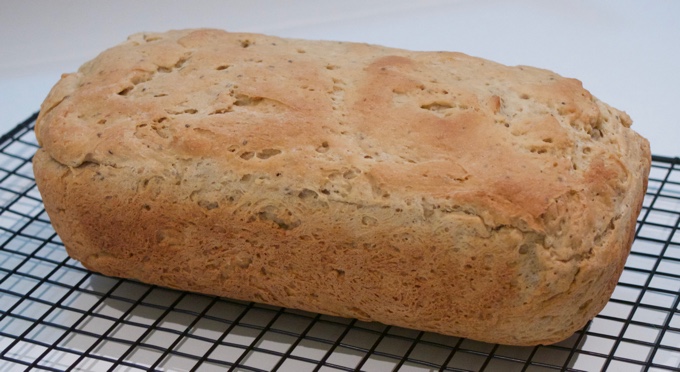
Bake for around 50 minutes total then turn out on to a cooling rack immediately.
Enjoy!
About hydroxypropyl methylcellulose
Also known as Hypromellose, HPMC or e464. As it has industrial uses always ensure you’re getting food grade, the industrial product can contain nasty contaminents due to cheaper production processes.
In this bread it performs some of the role of gluten, along with Xanthan and Guar gums. It forms long chains that can trap the gas released by the yeast and allow the bread to rise. It does this at baking time as it requires heat to solidify, unlike gluten.
HPMC is a cellulose-derived polymer. Cellulose makes up the bulk of indigestable plant matter and is completely natural. The chemical processes used are well understood and cellulose-based binders are present in a lot of manufactured foods. While there is the potential for an adverse reaction, as there is with any food item, this is unlikely as the human body cannot break down the structure.
That said you may not trust chemically manufactured food products, so I’ve included an egg-based option that works well.
Substituting Flours
There’s only one must-have flour in this recipe, buckwheat. This helps the texture a lot, though you can replace with another heavy flour if you cannot find buckwheat flour.
There’s two broad categories of flour in this recipe, a “heavy” flour and a starch. As long as you keep the ratio between starches and flours the same you can change them.
Cornflour is pretty universally available, but the tapioca can be substituted with arrowroot.
Other heavy flours you can try include Soy flour and Amaranth flour. Try what you can find, you might find an even better option.
